
Boy howdy has this been a week. This ORC has been kicking my butt! There are so many projects in the queue for this laundry room, and so many of them require specific products that haven’t arrived. They all require a lot of attention to detail and concentration. Most of them are outside of my comfort zone. When I realized that, I figured I might as well start with the geometric wood wall.

This wall treatment is inspired by a few great designers: Bre of @brepurposed and Katty of @one.four.six. They both made beautiful geometric wood walls that made me stop in my tracks. Bells and Whistles in Pasedena has a beautiful wall that served up some serious inspiration as well.
Now that those geniuses have their credit, I’ll tell you my story.
I searched for the cheapest way to do this. I am currently renting this home that I’m in, so I want to pull off this reno for the lowest budget possible. In the past I have used cedar fence boards for projects because they’re usually the cheapest source material. In this case it would have cost well over $200 to go that route. I knew I didn’t want to use plywood if only for the quality of the finish (and perhaps the extra effort of ripping and sanding each board to size). As it turns out, last year my mom found a fence on craigslist that someone was tearing down. They gave it to her for free, and she’s been storing the wood for over a year. And she offered it to me! So my wood was mother-sponsored and only required me to sand it down to remove the weathered finish.

I sanded and sanded and sanded! Seriously, probably 8+ hours of sanding. My arm went dead. No big deal, who needs it? Next I needed to decide on a design. I thought this would take hours (as mural design often can), but pressed the easy-button and decided to duplicate the design of my media room mural. Easy peasy.

I first coated all the walls with a layer of 1/4 in plywood. This wood would show between the cracks of the boards and would also provide more support for the nails I’d use to hang the wood.

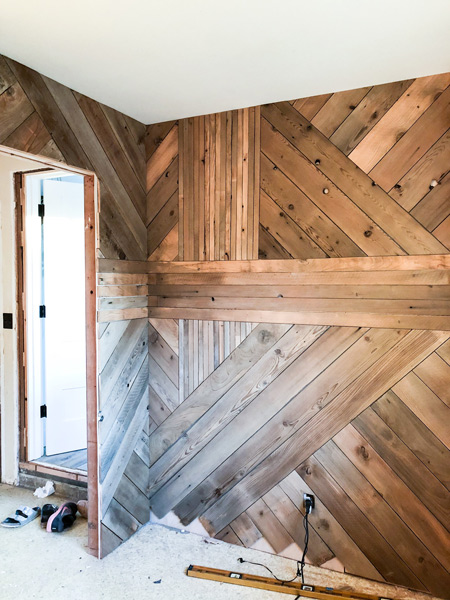
I used the base fence-board width as my widest measure and then ripped a few boards in half for the horizontal stripes and then in half again for the vertical stripes (which are new to the design). I just used my sister’s table saw for this.
Next, I used my miter-saw for all the other cuts. And it probably took 2-3 cuts per board to make them sit just right. Although my laundry room and garage (where my saw is) are right next to each other, I averaged 4-6 miles a day just walking between them. If that doesn’t illustrate how much work went into getting the right cuts, I don’t know what will!

The secret weapon of this whole project is this baby, my Ryobi pin nailer. It is battery powered (no obnoxious air compressor) and has such fine pins that you can barely see where they enter the wood. I knew this would be crucial when I set out to do this project because I wanted to keep the wood natural and wouldn’t want to fill it at all. So I reached out to Ryobi and they graciously sent me this magical pin-nailer. I have lusted after this bad boy for months and I tell you it does NOT disappoint. I’m in love. Seriously. No other possession is half as prized.
A good audiobook (or two), a movie (or two) and a tv series to watch is all that’s left. That and 4 days of work. After all of that, all I can say is that “my dogs are barking!”

What do you think? I have a slight fear that this will come off as too farmhousey or sauna-y. I figure it will all come down to the styling of it! Which I will be working on this next week as I build the benches that will go in this mudroom also. Now a quote from my mom: “the devil is in the details”.
Don’t forget to go check out all the other participants in this season of the One Room Challenge!